Turn mods on or off and set their load order
 HapticGuide
Every installed mod has an Enabled switch in the Mods card: turn it off and the mod stays installed with all its settings, it just will not load the next…
Every installed mod has an Enabled switch in the Mods card: turn it off and the mod stays installed with all its settings, it just will not load the next time your server starts. Nothing touches your world. Once you have two or more enabled mods, a Load order button lets you drag them into the order they should load, top to bottom. Both kinds of change save instantly and take effect on the next restart.
Turning a mod off is not the same as removing it
The checkbox on each mod row installs or removes the mod, so do not uncheck a mod just to switch it off: that stages an uninstall. To turn a mod off while keeping it, use the Enabled switch instead:
Open your dashboard, find your server's card, and open its Detail view.
Click the Mods card to expand it.
Click the row of an installed mod (the row itself, not its checkbox). The mod's detail panel opens.
Find the Enabled switch toward the bottom of the panel. The helper text says it plainly: "Disabled mods stay installed with their settings but won't load on the next boot. Useful for freeing memory without losing your mod list."
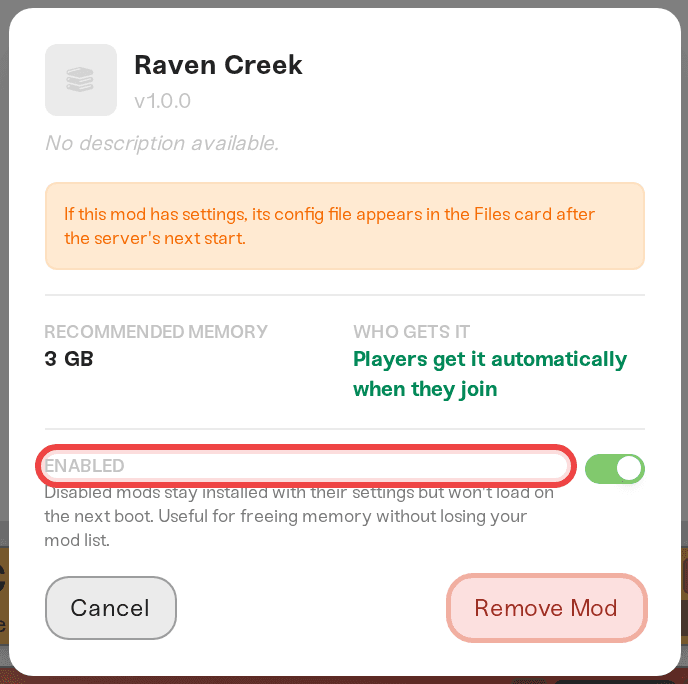
Flip it off and the change saves immediately; a toast confirms "Settings will be applied the next time this server powers up." Back in the list, the mod's row dims and shows a grey Disabled chip so you can see at a glance what is switched off. Flip the switch back on any time; the mod loads again on the next start with its settings exactly as you left them.
Disabling is the right move when:
Your server is short on memory. Mods cost memory even when you are not using their content. Disable the heavy ones you are not playing with right now; see Understanding your memory budget.
You are hunting a crash. Disable everything, then re-enable mods a few at a time between restarts until the culprit shows itself. No reinstalling, no lost configs.
A mod is broken after a game update and you want to keep it parked until the author ships a fix.
Removing a mod is different: unchecking it stages a change you confirm with Save changes, and if the mod's content is baked into your world we create a safety backup first. That flow is covered in Install mods on your server.
Turn everything on or off at once
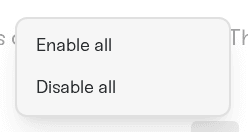
With two or more mods installed, a small menu button (stacked lines icon) appears in the row of controls at the top of the Mods card. It has two entries: Enable all and Disable all. Handy for the crash hunt above, or for switching your whole mod list off before a vanilla play session.
Change the load order
Games load mods one after another, top to bottom. For most mod lists the order never matters, but some mods are explicit about it: libraries and frameworks want to load before the mods that use them, and when two mods change the same thing, the one that loads later usually wins. If a mod's page says "load this after X", this is the tool for it.
Once your server has two or more installed and enabled mods, a Load order button appears at the top of the Mods card (it shows the count, for example "Load order (4)").
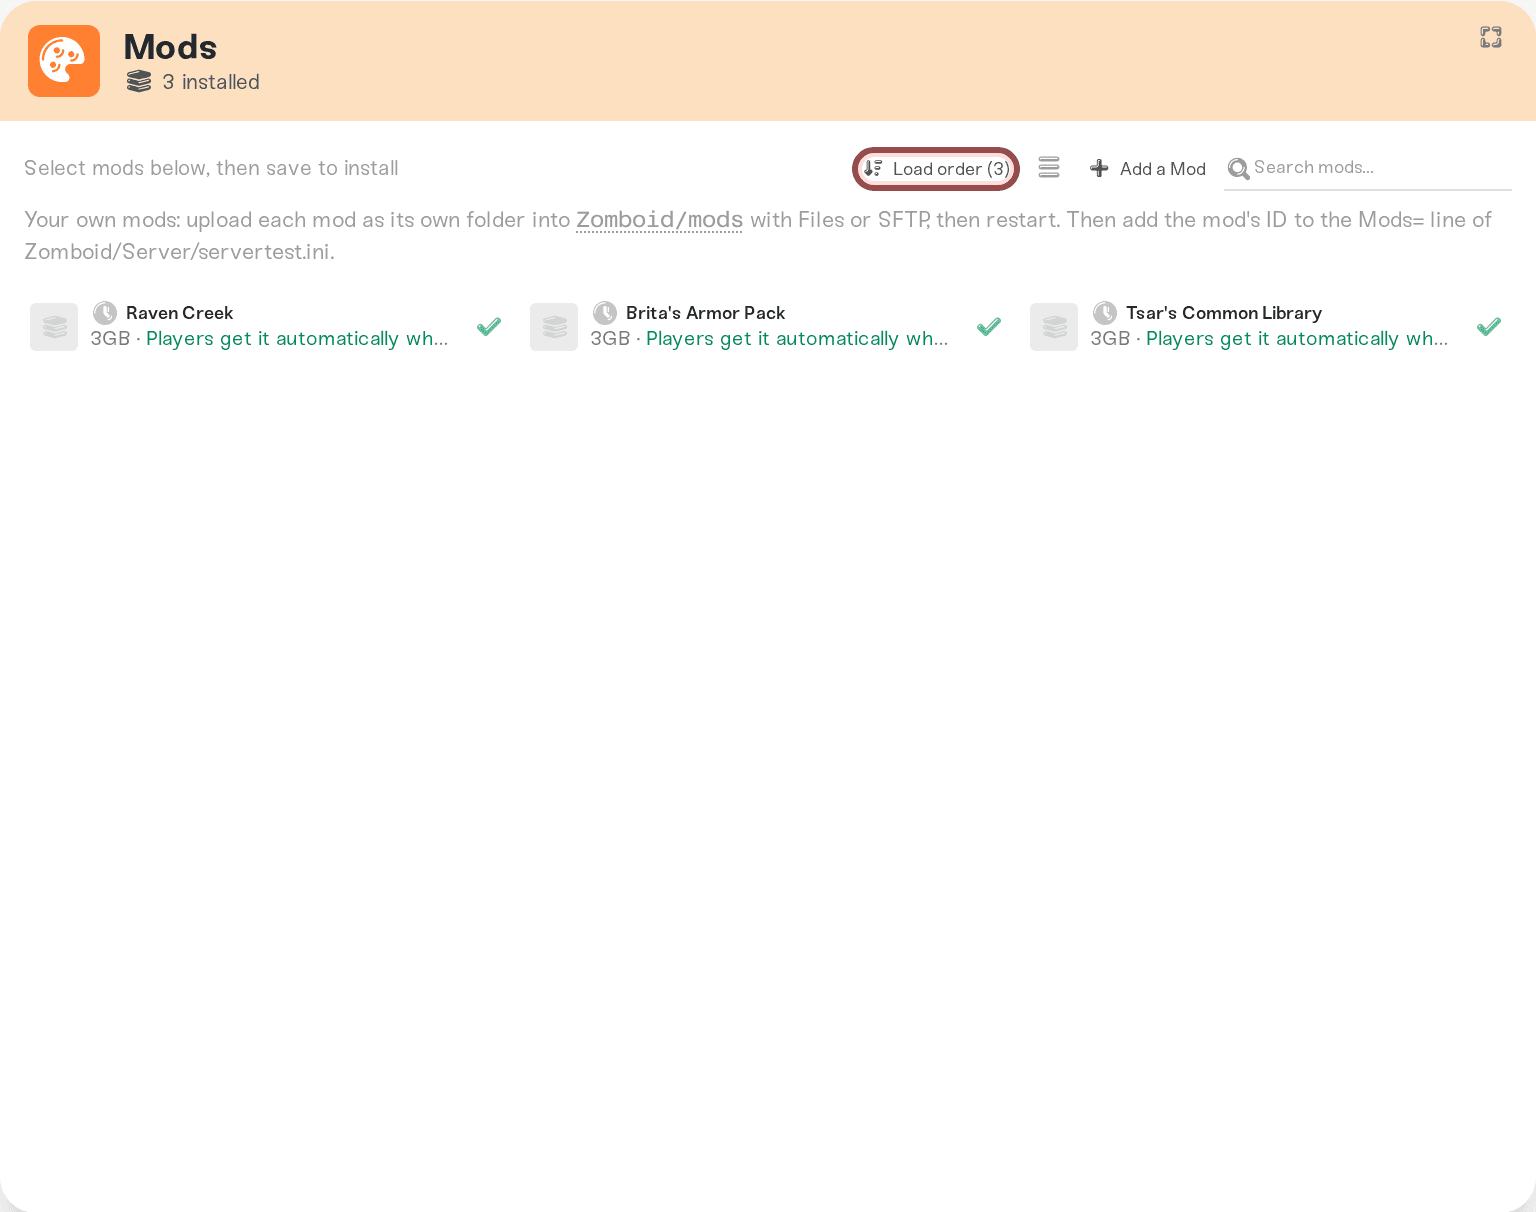
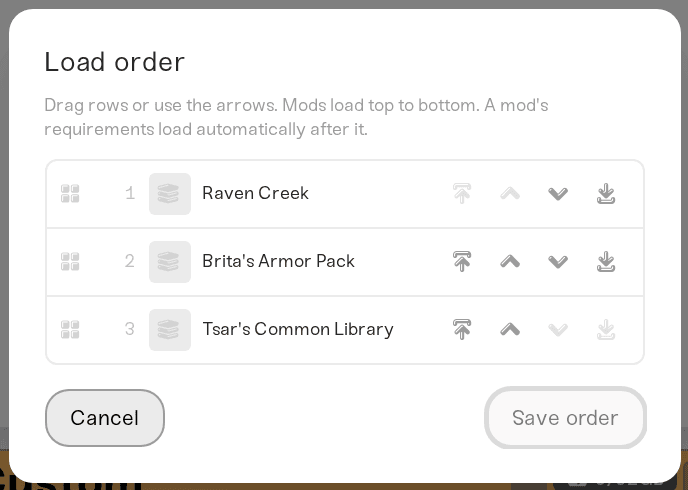
Click Load order. The dialog lists your enabled mods in their current order, numbered from 1. As the dialog says: "Drag rows or use the arrows. Mods load top to bottom. A mod's requirements load automatically after it."
Drag a row by its handle, or use the four arrow buttons on each row: Move to top, Move up, Move down, Move to bottom.
Click Save order. A toast confirms "Load order saved. Applies on the next restart." Cancel throws your changes away.
A few details worth knowing:
Disabled mods are not listed. They do not load, so there is nothing to order. Re-enable a mod and it joins the list again.
Dependencies order themselves. Anything we auto-installed as a requirement loads right after the mod that needs it, so you never have to place libraries by hand.
The editor works the same on every game that has a Mods card. Project Zomboid is the game where order matters most; Project Zomboid: Mod load order and custom maps covers its specifics, including map mods.
When your changes take effect
Enable/disable flips and load order changes save immediately but apply on the next start: the running server keeps its current mods until it powers down. Restart whenever you are ready; see Start, stop, and restart your server. Your server does not need to be online to make any of these changes.
If a mod fails our compatibility check
We keep re-testing catalog mods in the background against current game versions. If a mod you have installed fails that re-test, its row gets a yellow Re-test failed chip and a warning strip appears at the top of the Mods card: the mod "failed our latest compatibility test and may crash your server the next time it starts. Disable it below to keep the server safe, or wait for the mod author to ship a fix."
That is exactly what the Enabled switch is for: park the mod, keep your settings, and re-enable it once the author updates it. You do not need to uninstall anything. Once the mod is disabled, the warning strip disappears; the yellow Re-test failed chip stays on the row so you can find the mod again later.
Edit a mod's settings
Installed mods can show a gear (⚙) button on their row. It appears once there is something to edit, and does one of two things depending on the mod:
Edit config opens a built-in editor right in the dashboard. The dialog is titled with the mod's name plus "Config", shows which file you are editing, and has Save Config and (once you have customized it) Reset to Default buttons. When your server's own copy of the file is available, the editor shows "Showing live on-disk file (source of truth)." and saving writes straight to the server. If the file cannot be written (for example while the server is offline), the dashboard warns you; the copy on the server stays authoritative, so edit it in Files or over SFTP, or try again when the server is online.
Open config file jumps you to the mod's config file in the Files card, where you edit it like any other file; see Edit config files and Connect with SFTP.
If you just installed the mod and see no gear, that is expected. Most mods only create their config file the first time they run, and the dashboard tells you so in the mod's panel: "Restart your server to load this mod. If it has settings, its config file will appear in the Files tab after that first start." Restart once, and the gear shows up if the mod has anything to configure.
Good to know
Disabled still counts as installed. On Minecraft Java, installed mods pin your server's game version, and a disabled mod keeps that pin; on Valheim, crossplay needs a completely mod-free server, so disabling is not enough to turn crossplay back on. Remove the mods if you need the version unlocked or crossplay re-enabled; see Valheim: Mods or crossplay.
Friends with the Server Operator role can see the Mods card but cannot change anything in it; toggles, load order, and installs need the Server Admin or Account Admin role. See Friend roles and permissions.
Turning a mod off does not change what players need. A disabled mod simply does not load, so players do not need it either while it is off. Which mods players must install on their own PC is a per-mod question; see Server-side vs client-side mods.
Need help?
If a mod refuses to behave no matter the order, or you are not sure which one is crashing your server, message us on Discord or email support@haptic.gg. Tell us your server name and which mods you have installed (a screenshot of the Mods card is perfect), and we will help you narrow it down.